在网上找到几篇基于PHP5的扩展开发的文章,有些古老,与PHP7不完全兼容,自己做了些简单的翻译、修改。

建议开发者先阅读PHP Internals Book这份在线文档,里面对PHP做了比较全面的讲解。由于PHP扩展开发的资料比较少,也鲜有PHP开发者触及到这块,编写扩展时如果遇到问题,最好是先查找PHP源代码是否有相关的使用案例,再通过网上论坛、QQ等方式寻求帮助。

本文是PHP扩展开发系列的第一篇,主要介绍如何开发一个简单的PHP扩展、如何获取ini配置参数、如何配置全局变量

前期准备:

PHP编译选项加入--enable-debug以及--enable-maintainer-zts--enable-debug生成额外的调试符号,并将优化等级设置为-O0,报告内存泄露等错误,使使用gdb进行debug时更为准确;--enable-maintainer-zts启用线程安全,开启ZTS宏定义,配置PHP为TSRM机制,用于编写调试多线程代码

Hello World

扩展目录结构

你可能会使用PHP源代码自带的脚本ext/ext_skel.php生成扩展骨架,但这里选择极简方式创建一个扩展,最基本的扩展只需要三个文件:配置文件config.m4,头文件php_test.h,源文件test.c

test扩展目录结构

1
2
3
4
5
6
php-7.4.1
└── ext
└── test
├── config.m4
├── php_test.h
└── test.c
阅读全文 »

简单介绍如何使用github pages服务以及hexo搭建一个免费的个人博客

准备

创建仓库

创建一个空的仓库,名字固定格式为“username.github.io”,这个名字也是博客的访问的域名

安装hexo

1
2
3
4
5
6
7
npm install -g hexo-cli           # 安装hexo命令行工具
hexo init blog # 创建blog项目

cd blog
git clone https://github.com/theme-next/hexo-theme-next themes/next # 安装next主题,可选

npm install hexo-deployer-git --save # 安装github发布工具

配置

配置hexo

修改_config.yml

1
2
3
4
5
6
7
8
9
10
11
12
13
14
15
16
17
18
19
20
21
22
23
24
25
26
27
28
29
30
31
32
33
34
35
36
37
38
# 基础配置
# Hexo Configuration
## Docs: https://hexo.io/docs/configuration.html
## Source: https://github.com/hexojs/hexo/

# Site
title: Y2k38's Blog
subtitle:
description: y2k38's blog
keywords:
author: y2k38
language: zh-CN
timezone:

# URL
## If your site is put in a subdirectory, set url as 'http://yoursite.com/child' and root as '/child/'
url: https://y2k38.github.io
root: /
permalink: :year/:month/:day/:title/
permalink_defaults:

...

# 博客主题配置
# Extensions
## Plugins: https://hexo.io/plugins/
## Themes: https://hexo.io/themes/
theme: next # 可选,若没有安装next主题,则忽略

...

# github部署配置
# Deployment
## Docs: https://hexo.io/docs/deployment.html
deploy:
type: git
repo: https://github.com/Y2k38/y2k38.github.io.git
branch: master # 注意,分支固定位master

发布github

1
hexo clean && hexo deploy

完成

其他

添加gitalk评论系统

[Deprecated] github要求校验方式改为personal access token,待gitalk作者及theme-next作者更新

新建OAuth application获取id、secret,https://github.com/settings/applications/new

new oauth app

配置next主题 themes/next/_config.yml

1
2
3
4
5
6
7
8
9
10
11
12
13
14
15
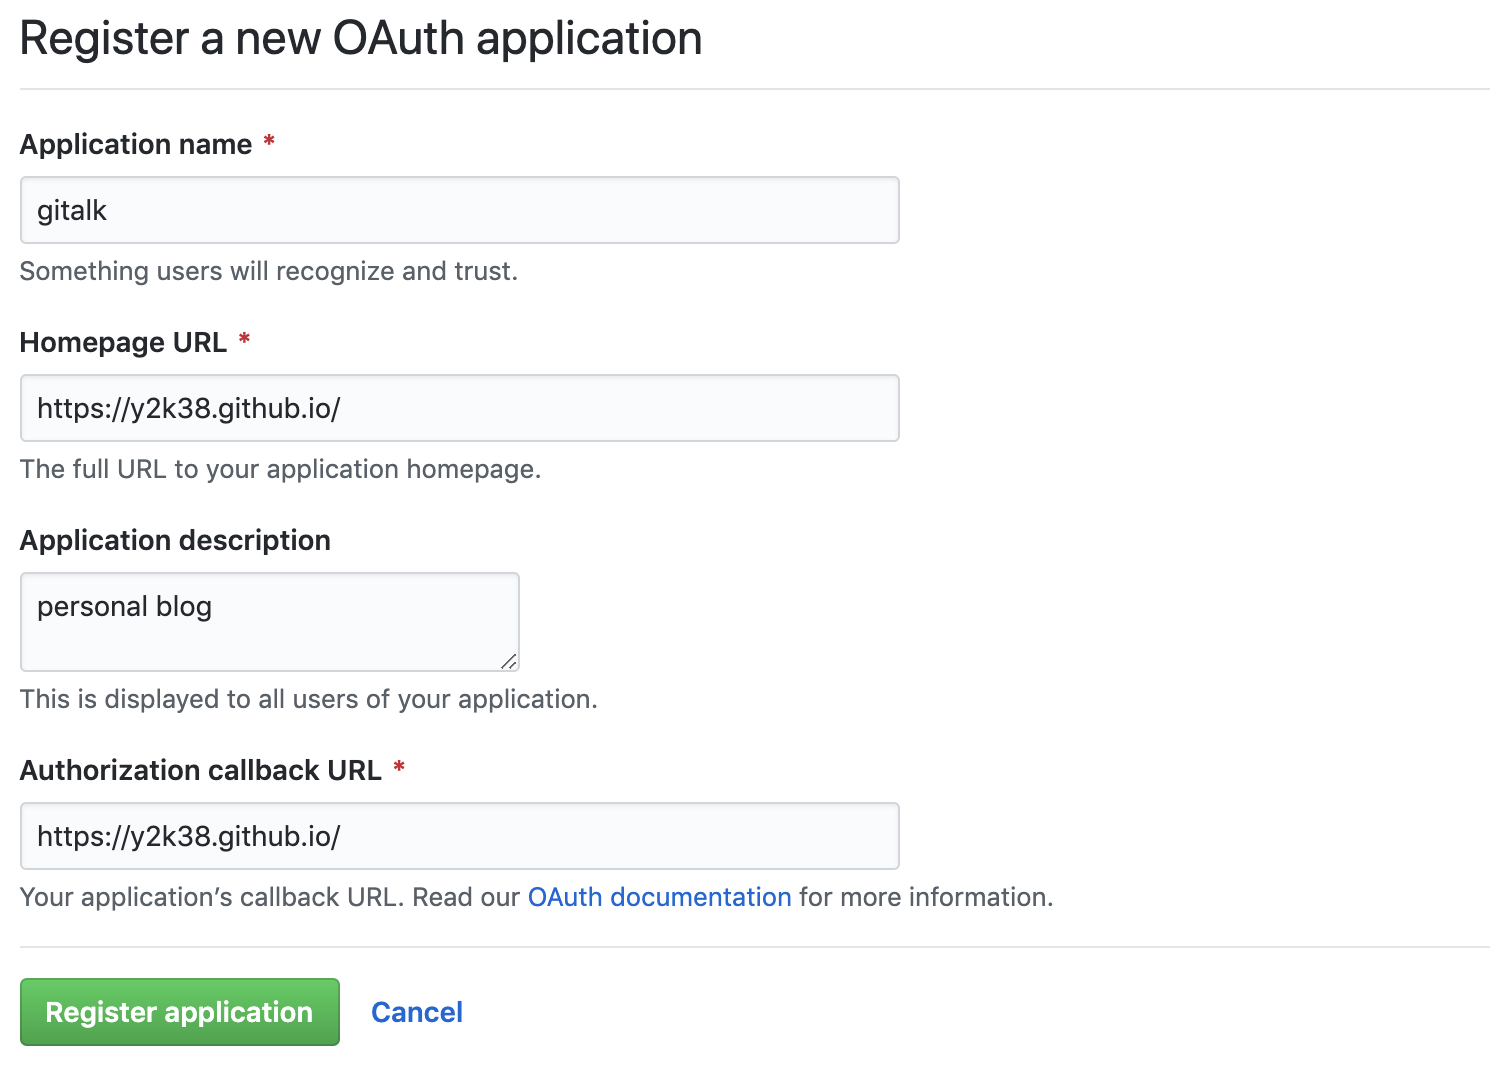
# Gitalk
# Demo: https://gitalk.github.io
# For more information: https://github.com/gitalk/gitalk, https://github.com/emn178/js-md5
gitalk:
enable: true
github_id: y2k38 # GitHub repo owner
repo: y2k38.github.io # Repository name to store issues
client_id: xxxxxxxxxxxxxxxx # GitHub Application Client ID
client_secret: yyyyyyyyyyyyyyyy # GitHub Application Client Secret
admin_user: Y2k38 # GitHub repo owner and collaborators, only these guys can initialize gitHub issues
distraction_free_mode: true # Facebook-like distraction free mode
# Gitalk's display language depends on user's browser or system environment
# If you want everyone visiting your site to see a uniform language, you can set a force language value
# Available values: en | es-ES | fr | ru | zh-CN | zh-TW
language: zh-CN

参考文档

GitHub Pages
How to use Hexo and deploy to GitHub Pages
Creating a personal access token for the command line

简单介绍如何生成https服务所需要的证书、私钥以及部署,文档分别描述了开发时使用的self-signed证书以及线上使用的let’s encrypt免费证书的生成方法

自签名证书

创建证书以及私钥

1
sudo openssl req -x509 -nodes -days 365 -newkey rsa:2048 -keyout /etc/ssl/private/nginx-selfsigned.key -out /etc/ssl/certs/nginx-selfsigned.crt
  • req: 指定X.509证书签名请求(CSR)管理

  • -x509: 生成self-sigend证书

  • -nodes: 不使用密码

  • -days 365: 证书有效期

  • -newkey rsa:2048: 生成证书的同时生成私钥,rsa加密算法,2048位

  • -keyout: 私钥的存储路径

  • -out: 证书的存储路径

信息填写

1
2
3
4
5
6
7
Country Name (2 letter code) [AU]:US
State or Province Name (full name) [Some-State]:New York
Locality Name (eg, city) []:New York City
Organization Name (eg, company) [Internet Widgits Pty Ltd]:Bouncy Castles, Inc.
Organizational Unit Name (eg, section) []:Ministry of Water Slides
Common Name (e.g. server FQDN or YOUR name) []: example.com (or server_IP_address)
Email Address []:admin@your_domain.com
阅读全文 »
0%